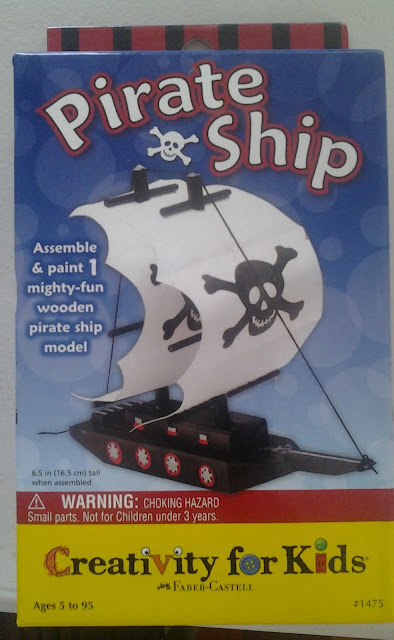
Making Faber-Castell's Creativity For Kids Pirate Ship Model #1475 Into a Nightlight
PRODUCT DETAILS
Model Number: 1475
Where I Bought It and Price: Joann Fabrics for $5.99
*Kit comes with everything you need. The kit comes with four paints: red, brown, black, and silver. If you want your ship to be another color, then you will have to purchase additional acrylic paints.
Ship Height When Assembled: 6.5 inches (16.5 cm)
Recommended Age: 5+
Adult Supervision: Young children, particularly if they can't read, may need help. Older children probably can do just fine on their own.
Time: They claim it takes 25 minutes + drying time. It took me three days, but then I did do more with it.
Made in China
UPC: 092633147504
Company: Faber-Castell USA, Inc., Cleveland, Ohio 44125
Websites: www.creativityforkids.com; www.fabercastell.com; www.joann.com
*Conforms to ASTM-D 4236. No idea what that means exactly--only that it is tested in ways to make sure your kid can't kill themselves with it.
*Non-toxic, safe for kids
Fun Rating: I personally enjoyed this more than I expected. 5/5
_________________________________________________________________________________
One thing I often hear from people who have kids is what to do with them during the summer vacation, particularly people who have sons. For this reason, I have decided on my second Youtube channel to start introducing crafts and things to do to entertain yourself. Some of it, like this project, may require money to be spent--but I'm hoping to also have videos showing things that can be done with household items. This project, though, didn't cost a lot of money.
I went to summer camp when I was a kid, and I remember doing the crafts--which at the time I thought were lame. I pretty much realized that summer camp was a conspiracy by adults to get their kids out of the house during the summer. That said, as I grew older, I remembered the crafts with a fond nostalgia. Adult Jessica thought they were fun, while inner child Jessica is calling Adult Jessica senile--insisting they were totally lame.
I actually enjoyed doing this kit very much, and I even found a use for it.
As I said in the product details, the kit pretty much comes with everything you need--quite nice, considering many kits these days don't. It even has sandpaper in case you need to sand some of the pieces. Glue and the brush are also included, but as I mentioned above in the product details--you will have to buy your own paint if you want your ship to be a color other than red, black, silver, or brown.
 |
| The model parts. |
 |
| Supplies included in the kit. |
One thing that did surprise me was how large the ship actually was. The box seems small, and I was expecting something that was a miniature. The ship was a good size, which interfered with my original plans to make a ship in a bottle. I couldn't find a transparent bottle that was large enough.
Preparation
If you are working with little ones, you will want to prepare for the mess that might ensue.
1. Acrylic paint dries permanently, so be sure to cover the work area with newspaper or something protective.
2. Wear old clothes or smock.
3. Have paper towels, soap, and water handy to clean up spills--which should be done immediately to prevent staining.
4. If the paint is too thick, mix it with a few drops of water.
5. Clean the brush with soap and water after you are done.
STEP 1
The instructions label the pieces, so refer to them. The first step is to glue the cabin on top of the center of the ship. Hold the pieces together for a few moments until the glue sets. You may need to sand the pieces if they don't fit together well. If the pieces seem too loose, add more glue. I found the glue plentiful for the project, but if you need more, I'd suggest Elmer's Glue All.
STEP 2
At this point, make sure you know the back and the front of the ship. Glue the main mast into the front hole on top of the cabin. The holes in the mast should point to the sides. I personally saw no difference in appearance between the main mast and the fore mast.
STEP 3
Glue the fore mast into the second back hole on top of the cabin. Like the main mast, make sure the holes are pointing to the sides. If you want to talk all pirate-like, here are some useful terms you need to know besides "argh":
port: the left side of the ship
starboard: the right side of the ship
STEP 4
Glue the bowsprit to the front of the ship, the notch side pointing outward. Pronunciation guide--the bow in bowsprit is pronounced like bow in "taking a bow" rather than bow like a little girl's hair decoration. Another useful term--the front of the ship is known as the bow (pronounced the same way as the bow in bowsprit).
STEP 5
Glue the sternhold to the back of the ship. The back of the ship is called the stern.
Your ship should look like this by now:
I wanted to model my little ship after The Black Pearl in the first movie of The Pirates of the Caribbean. Of course, this ship didn't exactly look like The Black Pearl...but as close as I could get it.
 |
| The Black Pearl in The Pirates of the Caribbean |
They tell you in the instructions not to paint the sails, but The Black Pearl didn't have white sails. I colored the sails black with marker, and then I painted the skull with white acrylic paint. As I'm a painter, I already had acrylic paints in additional colors. On the back, I drew vertical stripes with black marker, and then I colored it with a gray crayon. I left the skull its original color. I also cut holes in the sails, for as you can see the Black Pearl's sails were rather holey. It makes you wonder how she could be so fast--let alone propel in the water at all with so many holes in her sails.
 |
| I cut holes in the paper sails. |
 |
| I used black marker to color them black and white acrylic paint on the skulls. |
STEP 7
After the paint is dry, insert the longest dowel into the bottom hole of the main mast. You may want to put a dab of glue in the middle of the dowel. Repeat this step with the fore mast.
STEP 8
Slide the paper sail down onto the main mast to the bottom dowel.
STEP 9
Slide the middle dowel into the second hole above the sail. The middle dowel will be shorter than the longest dowel but bigger than the smallest. At this point, you make a decision. If you take a look at the front of the box, you will see that the top dowel (which is the shortest) goes on top of the sail. I personally didn't do that. I put the remaining dowels in, and then I put my sail on top of the shortest dowel. If you want to do it the way the box shows it, insert the top of the sail onto the main mast after putting on the middle dowel, and then put on the shortest dowel.
STEP 10
You may want to put glue on top of the bottom dowel to secure the bottom sail. As for the top, you will want to do the same--though where you apply the glue will depend on how you position the sail. If you chose to do it the way the box did it, you will put it under the shortest dowel. If you did it the way I did, you will put it on top of the shortest dowel.
STEP 11
If you haven't put on the bottom dowel on the fore mast, repeat steps 7-10. If you have the bottom dowel on the fore mast, repeat steps 8-10.
STEP 12
Now you can paint the masts and dowels, which is rather difficult to do when it is assembled. I wondered why they did it this way? Would painting the pieces first interfere with adhesion? Or would assembly scratch the paint? I don't know, since I mostly followed their directions.
STEP 13
Take the black string and tie it around and through the notch on the bowsprit. I actually didn't put it through the notch.
Then draw it over the two masts. They both have slots on the top. I added a little glue to secure the string.
Slide the string through the little hole at the back of the ship and tie a knot. Cut off any excess string.
This is how my ship looked at the end:
Going Further
As I said, my original plans were to make a ship in the bottle. Unfortunately, this ship was just too big for most large bottles that I could find (or those that are transparent enough). That is when I decided to alter my plans and make a nightlight instead.
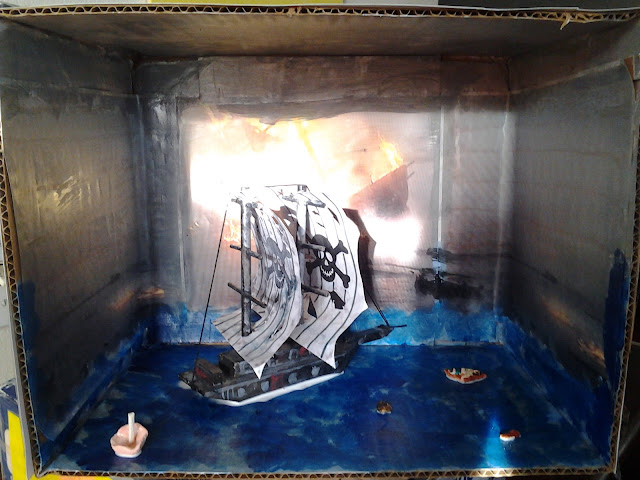
I found a box that was big enough. I cut off the flaps on the top, and then I cut a square hole in the back...being certain to leave about an inch margin.
I took a picture of the scene I wanted in the first movie of The Pirates of the Caribbean. Remember when the ship Elizabeth Swann was on as a little girl came across the other ship that had been blown to bits? Elizabeth's attention had been caught first by a floating umbrella, and then she saw young Will Turner afloat on a raft...and then they found the remains of a burning ship. After taking Turner's medallion, Elizabeth sees The Black Pearl.
I wanted to do that scene, but from the point of view of The Black Pearl after it had attacked the ship. I needed three pictures. The main picture was of the burning ship, which would cover the back hole. I then needed two side pictures to show the rest of the ocean. In this case, I actually just cut a part from the main picture and extended it in Paint. I then glued the three pictures inside the box.
Next, I applied gesso to any exposed cardboard inside the box, which was mostly the top and bottom. The top would be the sky, which I used white, light gray, and light blue to paint. For the bottom, which would be the sea, I used white, light blue, and dark blue. On the bottom, I didn't apply the paint uniformly. I purposely missed spots as I applied each color so that the undercoat would show through. I used dabbing, circular applications with my brush. I was quite proud of how it turned out.
With air dry clay, I made some floating debris--a plank and the top of the barrel (with the idea that the rest of the barrel was under water). I made the umbrella Elizabeth Swann had seen, and I made Will Turner floating on his raft. I painted them with gesso, acrylic paint, and then finished them with a water based varnish. I also varnished the inside of the box and the ship.
I decorated the outside of the box with scrapbook paper. I decided how I wanted to position the things inside the box, and then I glued them with Elmer's Glue All. The glue eventually dried clear.
I also cut up a comic book cover to tape onto the front of the box to keep dust out, because even with varnish there is really no way to clean it easily if it gets dusty.
 |
| A view of the inside of the box, before the glue dried clear and before I put the comic book cover on the front. |
When I put my nightlight behind the box, the scene is quite spectacular. I was very happy how this turned out.
Of course, at the moment I'm waiting for my Christmas lights to burn out--as that is what I have been using as a nightlight for now. However, this will be ready when they do finally go.


.jpg)
Comments
Post a Comment